UpCloud: HDD to MaxIOPS Storage Migration
If you’ve noticed performance issues on your HDD storages and you want to try out MaxIOPS you can use this guide to clone your HDD storage to a newer MaxIOPS storage.
Migrate HDD to MaxIOPS using the Control Panel (GUI)
- Take a backup of the HDD storage from your servers Backup page.

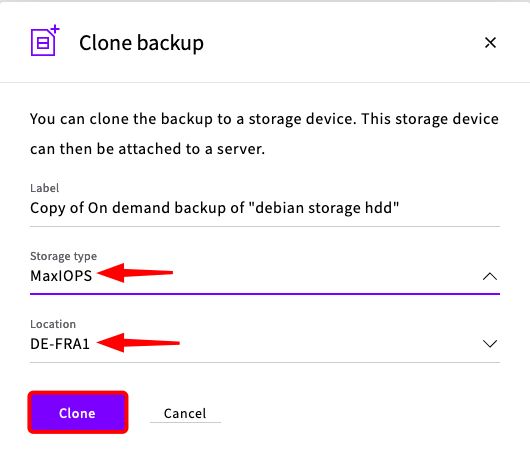
- Navigate to Storage > Backups. Select Clone to a storage.

- Ensure that the cloned storage is MaxIOPS and that the storage is in the same data centre as your server.

- Clone the disk. Depending on the storage size, the clone will take a bit of time to complete.

After the clone is complete it will be in a syncing state to build redundancy. Wait for it to complete. You will not be able to attach this disk to your server while it is syncing.

- Shutdown your server, then detach your HDD storage.

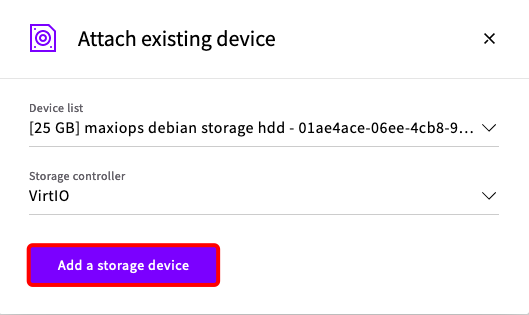
- Attach the new MaxIOPS storage by clicking on the Attach existing storage button.

- Select your MaxIOPS storage from the Device list and the Storage controller (if possible VirtIO is recommended).

- Start your server and connect to it to verify that it was a success. Your IP address and credentials stay the same.
Optional:
- Delete your HDD storage.
- Delete your backup of the HDD storage.
Migrate HDD to MaxIOPS using the API
Every URI assumes you are using https://api.upcloud.com and API v1.3. Other versions may or may not work!
-
Take a backup of the server using the HDD storage UUID.
1POST /1.3/storage/{uuid}/backup HTTP/1.11{ 2 "storage": { 3 "title": "Manually created backup" 4 } 5} -
Clone the backup to MaxIOPS. You can use the Backup UUID.
1POST /1.3/storage/{uuid}/clone HTTP/1.11{ 2 "storage": { 3 "zone": "fi-hel1", 4 "tier": "maxiops", 5 "title": "Clone of operating system disk" 6 } 7} -
Shutdown your server.
1POST /1.3/server/{uuid}/stop HTTP/1.11# Everything in this JSON is optional 2{ 3 "stop_server": { 4 "stop_type": "soft", 5 "timeout": "60" 6 } 7} -
Detach the HDD storage from the shutdown server.
1POST /1.3/server/{uuid}/storage/detach HTTP/1.11{ 2 "storage_device": { 3 "address": "ide:0:0" # Optionally use the storage UUID 4 } 5} -
Attach the MaxIOPS storage to the shutdown server.
1POST /1.3/server/{uuid}/storage/attach HTTP/1.11{ 2 "storage_device": { 3 "type": "disk", 4 "address": "virtio", # Optionally, leave this out to use the same storage controller 5 "storage": "00798b85-efdc-41ca-8021-f6ef457b8531", 6 "boot_disk": "1" 7 } 8} -
Start the server.
1POST /1.3/server/{uuid}/start HTTP/1.1 -
Connect to your server to verify that it was a success. Your IP address and credentials stay the same.
Optional:
- Delete your HDD storage.
- Delete your backup of the HDD storage.
Optional: Performance Test
Look into benchmarking the differences here.
1fio --name=randrw --ioengine=libaio --direct=1 --bs=4k --iodepth=64 --size=4G --rw=randrw --rwmixread=75 --gtod_reduce=1
That’s it! Thank you for reading and I hope you had fun! 🎉